![]()
![]()
Bottom Frame:
Materials:
2-1x4x4' dimensional lumber
2-1x4x2' dimensional lumber
The frame consists of a rectangle formed by 1x4's. Two 1x4x4' sections are required for the front and back of the long side. Two 1x4x2's should be cut down to allow for the 1x4s on the front.
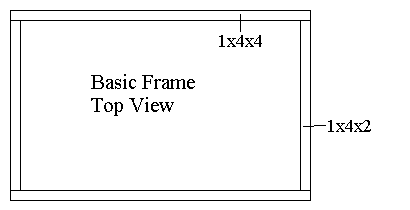
Screw two screws per corner from the long side in to the short sides. A corner clamp is a big help keeping the corner square.
Top Frame:
Materials:
Assembled Bottom Frame (See above)
4-2x2x4" (3 1/2") dimensional lumber
4-1x4x4" (3 1/2") dimensional lumber
In order to make the top frame easily removable, you must build a place for the 2x2 legs to be inserted. The plywood sheet will hold the frame in place on the top.
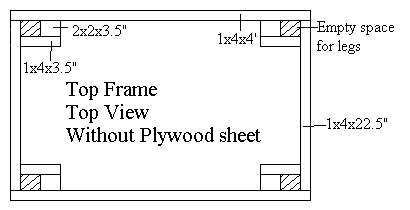
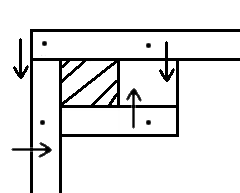
Determine if the 2x2 is the same length on all four sides. If it isn't, alignment of the 2x2 becomes important. If the 2x2 is of two different sizes, then determine which side you want facing forward on the 2x2x4' you'll use for legs. Align it so that side faces forward.
Screw in two 2" drywall screws on the front of the frame where the dots are. (Remember I said you'd need 8 in a corner?) The arrows indicate which way to put the screw in.
On top of the top frame, place a 2'x4' sheet of 3/4 inch plywood. Screw it on securely. Now the top frame's done!
Assembling the Module:
Materials:
Bottom Frame
Top Frame
2x2x4' Legs
Place the top frame upside down on a good surface. (Plywood on the ground.) Place the 2x2s into the slots in the corners. Do not use any screws to secure them there.
Next, place the bottom frame on the top frame so the legs are inside the frame. The bottom frame should be somewhere from 12"-24" from the bottom of the legs that are in the air. Secure the bottom frame with C-clamps then screws. (Or borrow a friend's help...) Once secured, you can turn the module over. It is complete, and ready for construction.
Optional step:
Cut the corners out of a second 2'x4' piece of 3/4" plywood and place it on the bottom frame. Secure it, and you have either a shelf or a bench.
1) To join a second module, use a drill and dowel rods to make sure they'll stay aligned. I also put a screw or two in between the joined sections.
2) When determining the height of the bottom frame, consider that you may be tempted to sit on it to do some of the wiring. My bottom frame has a piece of 3/4 inch plywood on it and is 19" from the ground. This is about 5" too little space for me to comfortably do something sitting under the layout.